How to Change the Chuck on a Drill
3rd Jun 2014
Repairing your own tools is often more economical than buying new ones.
Drill chucks do break eventually, often when a drill is used frequently. On the other hand they can also rust if they haven't' been used for a long time. Either way, if you are going to repair your own tool you know how to change a drill chuck.
The basic steps to changing a drill chuck are:
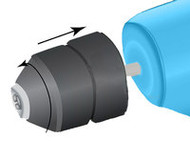
1. You need to loosen your drill's keyless chuck. Turn it to the right, or clockwise.
- You can remove the chuck if there is no screw inside it.
2. If there is a screw, use a screwdriver to take it out.
- Turn your screwdriver clockwise--toward the right--to loosen the screw.
- Then remove the screw.
3. Test hex key wrenches of different sizes and insert the largest one that fits into the chuck.
4. Tighten the chuck with the hex key wrench by turning the hex key wrench to the right.
5. Tap downward sharply with a mallet, pushing the hex key wrench in a counter clockwise direction. Tapping downward loosens the chuck. Loosen it enough with the hex key wrench so you can remove the chuck the rest of the way by hand.
6. Place the new drill chuck on by carrying out these steps in reverse.

